Yes, you read it correctly! Here in this blog cum our one-to-one conversation we will be discussing how to integrate Razorpay payment gateway in reactjs with APIs written in Node.js.
By the way, logic will remain the same so it doesn’t matter what languages are. So, let's start-
Step 1: Create an account on Razorpay here — Razorpay Dashboard and get your Key Id and Key Secret.
You will get them in Settings -> API keys.
Note- Just check and confirm that you are in Test Mode.
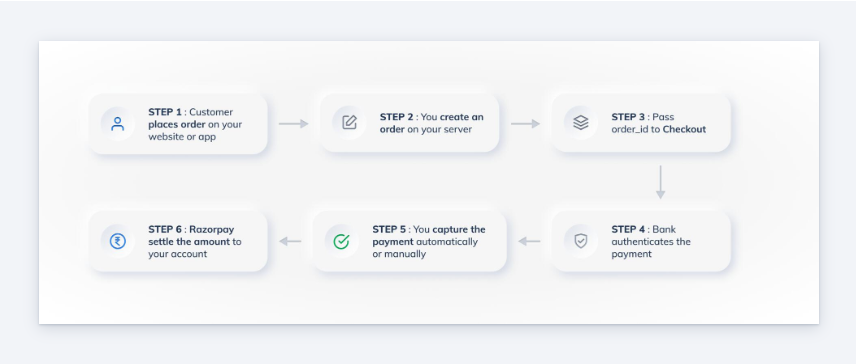
Step 2: I’ll name this step “Gyaan Charcha” in simple words “Knowledge Session” because in this step we will understand how Razorpay payment gateway works. What is the flow of the Razorpay payment gateway?
These steps are the main blocks of payment flow in Razorpay-


- The customer creates an Order.
- Razorpay creates an order id for it, which we use in our integration.
- Using the order id a checkout UI is opened, in which the customer enters the details and selects payment methods, and pays the amount.
- Then, this single payment gets a payment id which gets processed and we get razorpay_signature, razorpay_order_id, and razorpay_payment_id in response.
- Then, we have to authorize and capture this payment in order to settle and complete the whole transaction.
In the coming steps, we will be creating and handling these pointers.
Step 3: Let’s code now.
Note — Please read the comments because I tried to cover every possible detail in the comments.
Backend
Initializing Razorpay
const Razorpay = require('razorpay');
API route for creating an order
app.post('/order', async (req, res) => {
	// initializing razorpay
	const razorpay = new Razorpay({
		key_id: req.body.keyId,
		key_secret: req.body.keySecret,
	});

	// setting up options for razorpay order.
	const options = {
		amount: req.body.amount,
		currency: req.body.currency,
		receipt: 'any unique id for every order',
		payment_capture: 1,
	};
	try {
		const response = await razorpay.orders.create(options);
		res.json({
			order_id: response.id,
			currency: response.currency,
			amount: response.amount,
		});
	} catch (err) {
		res.status(400).send('Not able to create order. Please try again!');
	}
});
For accepting and validating payment
app.post('/payment', async (req, res) => {
	// Here you can retrieve the transaction id and amount from client.
});
Step 4:
Frontend
Basic code for a button with hard-coded values
const [displayRazorpay, setDisplayRazorpay] = useState(false);
const [orderDetails, setOrderDetails] = useState({
  orderId: null,
  currency: null,
  amount: null,
 });

const handleCreateOrder = async (amount, currency) => {
  const data = await axios.post(serverBaseUrl + '/order',
   {
    amount: amount*100, //convert amount into lowest unit. here, Dollar->Cents
    currency,
    keyId: process.env.REACT_APP_RAZORPAY_KEY_ID,
    KeySecret: process.env.REACT_APP_RAZORPAY_KEY_SECRET,
   }
  );

  if(data && data.order_id){
    setOrderDetails({
      orderId: data.order_id,
      currency: data.currency,
      amount: data.amount,
    });
    setDisplayRazorpay(true);
};

return (
  <div>
    <button
      onClick={() => handleCreateOrder(100, 'USD')}
    >Place Order
    </button>

  {displayRazorpay && (
  <RenderRazorpay
    amount={orderDetails.amount}
    currency={orderDetails.currency}
    orderId={orderDetails.orderId}
    keyId={process.env.REACT_APP_RAZORPAY_KEY_ID}
    keySecret={process.env.REACT_APP_RAZORPAY_KEY_SECRET}
  />
  }
  </div>
);
Now, the code for rendering Razorpay
import { useEffect, useRef } from 'react';
import crypto from 'crypto-js';
import PropTypes from 'prop-types';
import Axios from 'axios';

// Function to load script and append in DOM tree.
const loadScript = src => new Promise((resolve) => {
  const script = document.createElement('script');
  script.src = src;
  script.onload = () => {
    console.log('razorpay loaded successfully');
    resolve(true);
  };
  script.onerror = () => {
    console.log('error in loading razorpay');
    resolve(false);
  };
  document.body.appendChild(script);
});


const RenderRazorpay = ({
  orderId,
  keyId,
  keySecret,
  currency,
  amount,
}) => {
  const paymentId = useRef(null);
  const paymentMethod = useRef(null);

  // To load razorpay checkout modal script.
  const displayRazorpay = async (options) => {
    const res = await loadScript(
      'https://checkout.razorpay.com/v1/checkout.js',
    );

    if (!res) {
      console.log('Razorpay SDK failed to load. Are you online?');
      return;
    }
    // All information is loaded in options which we will discuss later.
    const rzp1 = new window.Razorpay(options);

    // If you want to retreive the chosen payment method.
    rzp1.on('payment.submit', (response) => {
      paymentMethod.current = response.method;
    });

    // To get payment id in case of failed transaction.
    rzp1.on('payment.failed', (response) => {
      paymentId.current = response.error.metadata.payment_id;
    });

    // to open razorpay checkout modal.
    rzp1.open();
  };


  // informing server about payment
  const handlePayment = async (status, orderDetails = {}) => {
    await Axios.post(`${serverBaseUrl}/payment`,
      {
        status,
        orderDetails,
      });
  };


  // we will be filling this object in next step.
  const options = {},

  useEffect(() => {
    console.log('in razorpay');
    displayRazorpay(options);
  }, []);

  return null;
};

export default RenderRazorpay;
Now, the most important part of the integration
const options = {
	key: keyId, // key id from props
	amount, // Amount in lowest denomination from props
	currency, // Currency from props.
	name: 'My custom title', // Title for your organization to display in checkout modal
	// image, // custom logo  url
	order_id: orderId, // order id from props
	// This handler menthod is always executed in case of succeeded payment
	handler: (response) => {
		console.log('succeeded');
		console.log(response);
		paymentId.current = response.razorpay_payment_id;

		// Most important step to capture and authorize the payment. This can be done of Backend server.
		const succeeded =
			crypto.HmacSHA256(`${orderId}|${response.razorpay_payment_id}`, keySecret).toString() ===
			response.razorpay_signature;

		// If successfully authorized. Then we can consider the payment as successful.
		if (succeeded) {
			handlePayment('succeeded', {
				orderId,
				paymentId,
				signature: response.razorpay_signature,
			});
		} else {
			handlePayment('failed', {
				orderId,
				paymentId: response.razorpay_payment_id,
			});
		}
	},
	modal: {
		confirm_close: true, // this is set to true, if we want confirmation when clicked on cross button.
		// This function is executed when checkout modal is closed
		// There can be 3 reasons when this modal is closed.
		ondismiss: async (reason) => {
			const { reason: paymentReason, field, step, code } = reason && reason.error ? reason.error : {};
			// Reason 1 - when payment is cancelled. It can happend when we click cross icon or cancel any payment explicitly.
			if (reason === undefined) {
				console.log('cancelled');
				handlePayment('Cancelled');
			}
			// Reason 2 - When modal is auto closed because of time out
			else if (reason === 'timeout') {
				console.log('timedout');
				handlePayment('timedout');
			}
			// Reason 3 - When payment gets failed.
			else {
				console.log('failed');
				handlePayment('failed', {
					paymentReason,
					field,
					step,
					code,
				});
			}
		},
	},
	// This property allows to enble/disable retries.
	// This is enabled true by default.
	retry: {
		enabled: false,
	},
	timeout: 900, // Time limit in Seconds
	theme: {
		color: 'green', // Custom color for your checkout modal.
	},
};
Step 5: Now let’s pay.
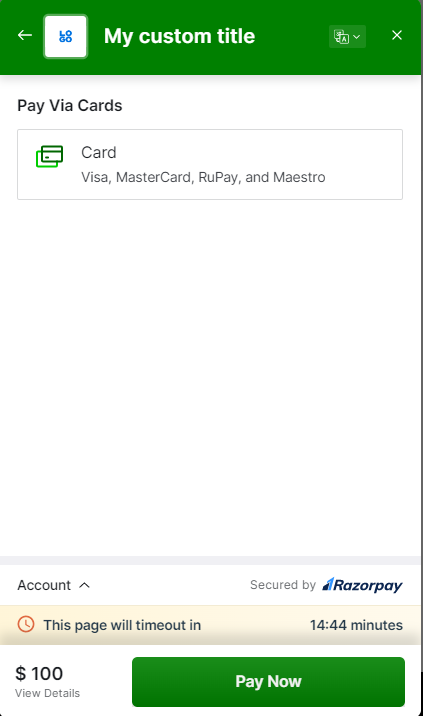
Here’s how it looks


Here are some important links which might be helpful for you:
- https://dashboard.razorpay.com/
- https://razorpay.com/docs/payments/payment-gateway/web-integration/standard/
- https://razorpay.com/docs/payments/payment-gateway/web-integration/standard/test-integration/
On that note, I’ll take a leave until the next blog.
We will learn something new next blog for sure.
Bye.
If you are reading this blog till here then do follow me on X — @okshubhh
final bye.
